
How to Repair a Single Shingle
It’s not a fun job to repair the roof during a howling gale or a torrential downpour. However, it’s better than the alternative.
The first step is to trace the source of the leak inside the home. Look for stains, sagging, dampness, or mildew. Once you find the stain or water damage, follow it to the outside. For more information, you can visit Roofer In Lancaster to proceed.
When a shingle is torn or damaged in some other way, it needs to be repaired quickly before the damage spreads. That’s because a small gap in the roof will allow water to seep into the house and cause untold damage. But repairing a single shingle isn’t as complicated or expensive as it might seem. Here’s how to do it:
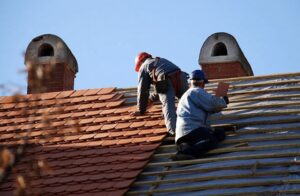
First, climb up on your roof using a ladder. Tie a climbing rope to a sturdy object at least as tall as the peak of your roof (a tree or your vehicle works well). Route this climbing rope over the object and secure it so you can climb safely.
Once you’re on the roof, locate the damaged shingle and use your cat’s paw prybar to lift the layer of shingles over it. Once the shingle is stolen, you can see the nail that holds it in place. Carefully remove the nail and then pull up and out the old shingle.
Next, place a new shingle over the gap. The shingle being replaced will likely need to be cut to the right length, so use your tinsnips to cut it to size. Make sure the shingle you’re installing isn’t touching any other shingles. If it is, you’ll need to apply a thick bead of roofing sealant underneath it, and then you can weigh the shingle down with a brick until the sealant dries.
If you can’t replace a shingle, use a utility knife to cut off any tabs dangling from the roof. Then, slide a new shingle over the tabs and into the gap, carefully aligning its front edge with shingles on each side and its back edge under the shingle above it. Nail it in place with galvanized roofing nails, hammering against a flat pry bar placed over the nails and under the shingle above (don’t hit the nailheads directly).
If you need to patch a crack in the shingle, apply a thin bead of sealing compound to the cracked area. Then, push a new shingle into place and nail it in with roofing nails if you can (they’ll need to be bent slightly to penetrate the roof sheathing).
Flashing is a thin metal material that protects the joints and seams in areas of your roof susceptible to water damage, such as valleys, dormers, chimneys, skylights, and eaves. Without flashing, or when flashing is damaged, these vulnerable spots can succumb to leaks that may affect the entire structure of your home. A roofing contractor can fix this by replacing the old flashing with new materials.
A roofing specialist can also repair loose flashing by resealing the area with roofing cement. However, this is only a temporary solution, as the sealant will break down due to exposure to ultraviolet rays, rain, and snow. It is also important to have a professional roofer inspect the flashing regularly to ensure it remains in good condition.
Over time, the metal in your flashing can become corroded, developing small holes and cracks. This is usually due to normal wear and tear, but severe weather conditions like hail can also cause it. If you notice any rust or dents in your flashing, it is important to call a professional for immediate repair.
Flashing can be secured into place by using screws that are made of the same metal as your flashing, and these should be covered with roofing cement to prevent water from seeping in. Having your roof inspected yearly by a professional roofer to fix any minor problems before they cause more serious issues is also a good idea.
An unsightly leaking roof can lead to costly water damage throughout your home. If you notice any signs of roof leaks, it is important to have the flashing repaired as soon as possible to avoid expensive repairs in the future. Water leaks from damaged or deteriorating flashing can lead to wood rot, ruined insulation, and stained ceilings. It is a good idea to call Lyons Roofing for help with your roof maintenance and repair needs so that we can catch any potential issues before they become serious.
In addition to the damage that can be done to shingles by wind or hail, your home’s siding can also take a beating. Even minor damage can cause problems if not repaired promptly, as it can allow air, water, and dirt through to the wood and other parts of your house. This can lead to mold growth, rot, and damage to your home’s siding and other parts. Fortunately, many siding issues can be fixed by a homeowner. However, if a large section of your siding is damaged, it may be more practical to replace it rather than try to repair it.
The first step to repairing siding is to thoroughly inspect the area and identify the type and extent of the damage. Look for rot, insect infestation, cracks, dents, and loose boards. If you have loose siding, a pry bar or crowbar can help to remove it carefully without damaging the surrounding boards. Once the old board is removed, it should be replaced with a new one treated with a wood preservative and insecticide.
If you have a hole or a crack in your vinyl siding, you can use a piece of patching material to cover it. Ensure that the patching material has a front, back, and end grain to seal all sides of the wood. It’s also a good idea to prime the patching material before you apply applying. It so well and doesn’t deteriorate prematurely.
For larger repairs, you can use a vinyl siding patch that matches the color of your existing siding to cover a gap or damaged area. Use a tape measure to take precise measurements of the damaged area. Then, cut a patch from a full-length piece of vinyl siding, ensuring it extends about two inches on either side of the damaged spot. Before reinstalling the patch, it’s important to de-gloss and wipe down the surface to ensure it is free of dust or other debris that could prevent a good bond between the patch and the vinyl.
Gutters are vital to your roof’s structural integrity. They are meant to channel water away from your home, preventing the buildup of water that can cause damage to your walls and foundation. If you have leaking or sagging gutters, it’s time to replace them. Gutters that aren’t functioning properly can leave your home vulnerable to water damage that can cost you thousands in repairs.
Gutter damage can occur from clogs, disconnections between gutter sections, and leaks. You can repair gutters with a little elbow grease, but if the damage is extensive, it’s best to replace them.
A gutter that isn’t functioning due to a clog can lead to basement flooding. The gutters direct water runoff from the roof, directing it 10 feet or more away from the home. If the gutters are clogged, water is left to pool near your foundation and cause cracks in the slab foundation or basement wall. A moist basement can encourage mold growth, which may require expensive remediation.
Over time, debris accumulating in gutters can create an ideal nesting spot for birds, rodents, mice, rats, mosquitoes, and other pests. The leaves, twigs, and other waste accumulated in the gutters attract these organisms and can damage your property. The wet gunk that gets in the gutter can also seep into your fascia boards and side panels, causing staining and rot.
Gutter damage also occurs from missing or damaged soffit panels, downspouts, or end caps. If these components are damaged, the entire gutter system is compromised and cannot perform its job. You can fix these items by replacing the missing or damaged soffit panel, downspout, or end cap.
Your homeowner’s insurance policy likely covers your gutters, especially if events covered by the policy damage them. You can get more information about your homeowner’s insurance coverage by contacting the company directly. Investing in a comprehensive homeowners’ insurance policy is one of the most valuable investments you can make. The money spent on a policy can cover damage caused by natural disasters, fires, theft, and other common types of loss.